Last year, I blogged about how to build Smart Dashboard with Gradle for FRC. Today, a student asked me how to build Motion Profile Generator using gradle. It’s similar, but seemed like a good time to update the post for this specific project.
You can use pure command line when reading/following this. Alternatively, you can use Eclipse as little or as much as you like. I include the Eclipse “gotchas.” (Spoiler: It’s faster to just use the command line)
Pulling from git
You can pull the code from git in any way you’d like. Common ways are:
- From the command line (or git bash): git clone https://github.com/vannaka/Motion_Profile_Generator.git
- From Eclipse, go to the git perspective, and paste in the URL.
- Download the project from github as a zip file. (Please don’t choose this option. It is better to use git properly. The only reason I’ve ever done the zip option is if I need to look at a code on a computer where I can’t install anything.)
Running Gradle at the command line
The discussion was centered around building Motion Profile Generator. If you aren’t involved with a FIRST Robotics Competition team, this is used to help with autonomous programming. As with many Gradle projects, the project comes with Gradle right in the project. So all you have to is:
- cd to directory you cloned Motion Profile Generator in
- chmod 700 gradlew
- ./gradlew build
Make sure you have internet before running this the first time. If you want to build directly from Eclipse, see my Eclipse Gradle post and skip to the BuildShip section.
Where is the output when building SmartDashboard?
Running gradle creates a build directory. You can look at it on the file system. Or if you are using Eclipse,
- Configure the filters so show the Gradle build folder
- Add/remove the JRE library as described here to get rid of the Eclipse errors about access restrictions.
- Hit refresh before looking for it.
I don’t care how gradle works, I just want to run the program!
No worries. Just:
- cd build/libs
- java -jar Motion_Profile_Generator-v3.0.0.jar
Ok now I’m curious, what gets generated?
This build directory contains a number of things:
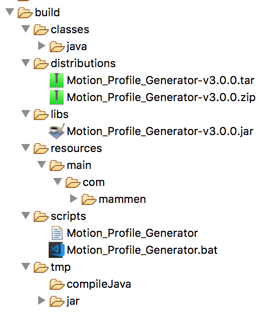
- distributions – a zipped up and tarred up version of Motion Profile Generator which includes the jar file, all need dependencies and the script to kick it off.
- classes – the compiled .class files
- libs – a jar file with the compiled code in this project
- resources – the JavaFX file (user interface files)
- scripts – to launch Motion Profile Generator
- tmp – would you really expect to find something important in a directory named tmp?
What does the Gradle build file do?
Gradle is a build tool. The build.gradle file in Motion Profile Generator contains Groovy code that declares what the build should do. Both Gradle and Maven follow “convention over configuration” which means that a lot is implied! I went over most (but not all) of this out loud in the classroom.
A plugin is like a helper tool that Gradle is going to use in order to build. For example, ‘java’ is going to compile among other things. Most of these plugins are in common use. Gradle needs to download files in order to run. This includes some default plugins. These files are hosted in a repository for binary files. A really common one is Maven Central. This is used by both Maven and Gradle builds to obtain binaries. This build file is really simple. It says that Gradle needs to know how to build a standalone java application.
plugins {
    id 'application'
    id 'java'
}
This tells Java to put some information in the manifest. In particular, which class should run automatically when you try to run the jar. It also includes a version number for reference.
mainClassName = "com.mammen.main.Main"
version = "v3.0.0"
Remember the convention over configuration thing I mentioned earlier? Convention says the source code is in the nested directories src/main/java. This project decided to put the source code directly in the src directory. Therefore the project needs to inform Gradle of this non-standard location.
sourceSets {
    main.java {
        srcDirs = ['src']; include '**/*.java'
    }

    main.resources {
        srcDirs = ['src']; exclude '**/*.java'
    }
}
Normally, Gradle projects include references to dependencies on the internet. This project decided to supply them directly in a lib directory. Again, a non-standard thing to inform Gradle about. (I think this decision is because Pathfinder has extra files)
dependencies {
    compile fileTree(dir: 'lib', include: '*.jar')
}
Next the script specifies that we should create a jar file and an uber jar file including the special files..
jar {
    from configurations.compile.collect { it.isDirectory() ? it : zipTree(it) }
    // Set up manifest to point the main class to the right class.
    manifest {
        attributes 'Main-Class': mainClassName
        attributes 'Version': version
    }
	from ("lib/native_libs") {
		into ("")
	}
}
The end! The very last thing is to declare which version of Gradle this entire script should be run with.
task wrapper(type: Wrapper) {
    gradleVersion = '3.3'
}
Output from building in gradle
I’m including the output from a “good” run in case you have problems and want to compare. This is for the first time you run it. After that the download steps won’t be in the output and it will run much faster.
JeanneBrskysMBP:Motion_Profile_Generator nyjeanne$ ./gradlew build
Downloading https://services.gradle.org/distributions/gradle-4.7-bin.zip
.......................................................................

Welcome to Gradle 4.7!

Here are the highlights of this release:
 - Incremental annotation processing
 - JDK 10 support
 - Grouped non-interactive console logs
 - Failed tests are re-run first for quicker feedback

For more details see https://docs.gradle.org/4.7/release-notes.html

Starting a Gradle Daemon (subsequent builds will be faster)

> Task :compileJava
/Users/nyjeanne/git/Motion_Profile_Generator/src/com/mammen/main/ProfileGenerator.java:4: warning: OutputFormat is internal proprietary API and may be removed in a future release
import com.sun.org.apache.xml.internal.serialize.OutputFormat;
                                                ^
/Users/nyjeanne/git/Motion_Profile_Generator/src/com/mammen/main/ProfileGenerator.java:5: warning: XMLSerializer is internal proprietary API and may be removed in a future release
import com.sun.org.apache.xml.internal.serialize.XMLSerializer;
                                                ^
/Users/nyjeanne/git/Motion_Profile_Generator/src/com/mammen/main/ProfileGenerator.java:435: warning: OutputFormat is internal proprietary API and may be removed in a future release
            OutputFormat format = new OutputFormat(dom);
            ^
/Users/nyjeanne/git/Motion_Profile_Generator/src/com/mammen/main/ProfileGenerator.java:435: warning: OutputFormat is internal proprietary API and may be removed in a future release
            OutputFormat format = new OutputFormat(dom);
                                      ^
/Users/nyjeanne/git/Motion_Profile_Generator/src/com/mammen/main/ProfileGenerator.java:439: warning: XMLSerializer is internal proprietary API and may be removed in a future release
            XMLSerializer xmlSerializer = new XMLSerializer(
            ^
/Users/nyjeanne/git/Motion_Profile_Generator/src/com/mammen/main/ProfileGenerator.java:439: warning: XMLSerializer is internal proprietary API and may be removed in a future release
            XMLSerializer xmlSerializer = new XMLSerializer(
                                              ^
Note: /Users/nyjeanne/git/Motion_Profile_Generator/src/com/mammen/ui/javafx/MainUIController.java uses unchecked or unsafe operations.
Note: Recompile with -Xlint:unchecked for details.
6 warnings

BUILD SUCCESSFUL in 24s
6 actionable tasks: 6 executed
