TLDR: use BuildShip rather than EGradle.
While everyone on our team uses command line git (rather than egit), most actual coding in Java happens within Eclipse. We ran Ant in Eclipse for deploying robot code and Ant at the command line for other things. I’m not sure if we will use Eclipse to run Gradle, but writing up for the team just in case!
For more on what the Gradle files mean see the main Gradle SmartDashboard post
EGradle
The first thing I did was try out the EGradle plugin. It worked, but wasn’t as smooth as BuildShip. (See below for using BuildShip).
Install EGradle
- Help
- Eclipse Marketplace
- EGradle
- Accept license and install
- Restart Eclipse
Modify the project you cloned from github
- Clone SmartDashboard if you haven’t already
- Edit the build.gradle file to add the eclipse profile. You just have to add the one line and save the file:
project(':fakeRobot') {
  apply plugin: 'java'
  apply plugin: 'application'
  apply plugin: 'eclipse'
Import the project you cloned from github
- File
- Import
- EGradle > Import gradle root project with all subprojects
- Set Gradle root project to the repository you cloned from github
Build
- Right click the build.gradle file
- Run as > EGradle
EGradle limitations
- You had to edit the build.gradle for Eclipse to recognize it.
- EGradle doesn’t provide a way to see the build directory so you have to go to the file system. (and yes I tried changing the filters; it just didn’t work)
Trying that again with BuildShip
BuildShip is the official Eclipse.org plugin for Gradle. Wish I knew that before I started!
Install BuildShip
- Help
- Eclipse Marketplace
- BuildShip Gradle Integration
- Accept license and install
- Restart Eclipse
Import the project you cloned from github
- File
- Import
- Gradle >Existing Gradle project
- Set project root directory to the repository you cloned from github (Note that you don’t need to edit the build.gradle file like you had to with EGradle). It also uses the proper project name.
Build
There are multiple ways to do this. I’m showing just one way that maximizes understanding of what is going on.
- The Gradle Tasks view is open automatically for this project. (If not, click the project)
- Click SmartDashboard to expand
- Click build to expand

- Right click build (with a green icon to the left) and choose “Run Gradle Tasks”
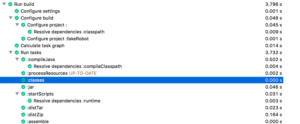
- This automatically opens the Gradle Executions view which shows you what Gradle did in a nice tree. You can click on the Console view to see the actual command line output.
- Configure the filters so you can see the Gradle build folder
- F5 to refresh – now you see the build folder.
Hi,
I started playing around with SmartDashboard, and this post was very helpful. I can build and my modifications seem to work.
However, the build process doesn’t seem to create the correct type of .jar to be launched by the Driver Station. The original SmartDashboard.jar can be launched with
java -jar “SmartDashboard.jar”
from a bash shell, or by double-clicking it. None of the outputs from the build seem to be viable for this.
Do you know what I need to do?
If you un-zip or un-tar the file in the dist/lib directory, it gives you a bunch of other jars. One of them is SmartDashboard. It isn’t meant to be run standalone though. They provide a script in the dist/bin directory that is meant for launching it.