using eclipse launch configurations to deploy FRC robot code faster in eclipse

I use Eclipse launch configurations at work and coding at home all the time. It never occurred to me to mention them to the team until last week. A student asked “is there a way to use a keyboard shortcut to deploy.”

Before

For those not familiar with FRC (FIRST Robotics Challenge), the deployment procedure is:

  1. Select the project in your workspace.
  2. Click “Run”
  3. Mouse over “Run As”
  4. Click “WPILib Java Deploy”

This kicks off the Ant build to do the deploy. Certainly not a terrible process. But when you do this dozens of times and in a rush, it can feel tedious. I think that’s why I never suggested it. At the lab, I ensure the students always drive at the keyboard. So I never have to click four things to deploy and it doesn’t feel tedious. Whereas when I’m coding myself, I feel it and optimize my time/clicking.

Setting up a launch configuration

The first thing I did was show how to set up and favorite a launch configuration.
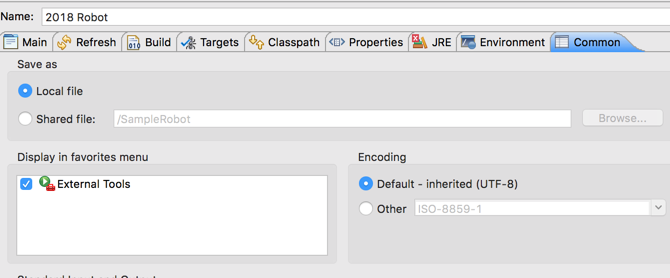
The initial setup:

  1. Run a build the “long way”
  2. “Run” > “External Tools” > “External Tools Configuration…”
  3. Click build.xml or build.xml (1) or whatever you see in the list. Confirm it is for this year’s robot. (You may find it easier to select all the build.* configurations, delete them and then run one new build.)
  4. Change the name to one that you like. For example, “2018 Robot”
  5. Click the “Common” tab
  6. Click “Display in Favorites Menu”
  7. Click “Apply”

Then to run it, you just click the triangle next to the launcher and it is stickied first in the list. (Be sure to click the triangle next to the green arrow with the red box. There’s also one without the red box which is used for running Java command line programs.)

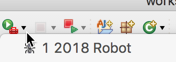
This gets us down to two mouse clicks. But it is still not a keyboard shortcut; the initial request.
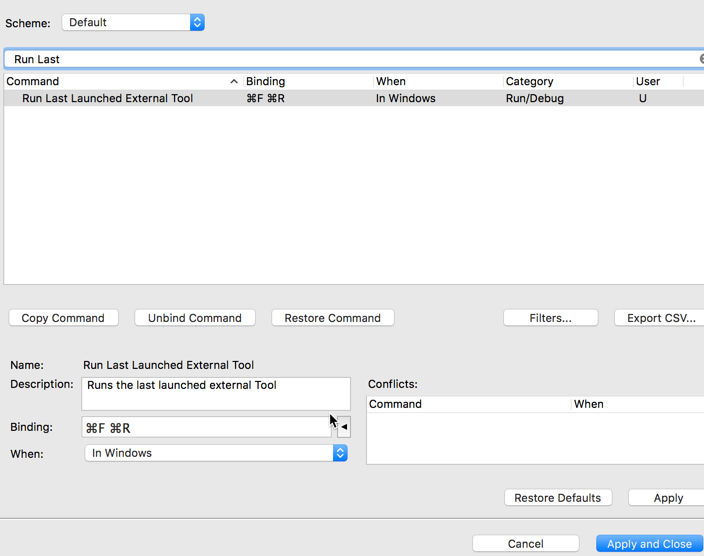
Keyboard shortcut

I had to look this up, but you can provide a keyboard shortcut. Sort of. I couldn’t figure out how to create a keyboard mapping to a specific run configuration. But that doesn’t matter here. We want to map to the last run configuration.

  1. Open the Eclipse preferences. (The Eclipse menu on a Mac and the Window menu otherwise)
  2. “General” > “Editor” > “Keys”
  3. Type “Run last” in the filter to find the matching entry
  4. Setup a binding. I chose command F + command R. (The beginning of spelling out FRC), but you can choose anything.
  5. note that the contest/when is “in windows”.  This means the shortcut is avilable when you have any file open. Just when you want when looking at or making robot code better.

getting started with gradle in eclipse on a mac

I’ve used Gradle before although not a ton. For example, I compared eGradle and Buildship here. It’s been a while though. Which means my laptop setup has changed enough for it to be an adventure. (and not everything I needed to know was in my memory).

Eclipse Oxygen comes with Gradle installed so I thought this would be easy. And if I had never installed Java 9 on my computer, that would have been the case. After all, you just need to run: File > New > Gradle Project

The original problem

I tried that and got this error:

org.gradle.tooling.GradleConnectionException: Could not fetch model of type ‘BuildEnvironment’ using Gradle distribution ‘https://services.gradle.org/distributions/gradle-3.5-bin.zip’.

Caused by: java.lang.reflect.InaccessibleObjectException: Unable to make protected java.lang.Package[] java.lang.ClassLoader.getPackages() accessible: module java.base does not “opens java.lang” to unnamed module @2e59aa

I got a similar error when trying to import an existing Gradle project. I have Gradle installed on the command line and it works fine.

What didn’t work 

I want to be using Java 8. I tried the following things that didn’t help:

  • Change eclipse.ini to use Java 8
  • Remove all Java 9 JDKs from the Eclipse workspace preferences.
  • Adding a system JAVA_HOME environment variable pointing to Java 8
  • This workaround editing the build.gradle file
  • A new workspace (my teammate teases me that my workspace was around when Obama got elected – I often do an upgrade in place)
  • Gradle code for Eclipse
  • Checked my versions against what is known to work. I do have Buildship 2.2+ (2.2.1) and Gradle 4.3+ (gradle 4.5).
  • Re-installing Eclipse and not installing/updating any plugins

Updating the plugin

Then I updated the Buildship plugin in Eclipse. Since I had done this in the past, I had to:

  1. Delete the Buildship update site
  2. Re-add the current update site. (Thanks to this post for the suggestion)
  3. Update plugin
  4. Restart Eclipse

That “helped” in that I got a different error:

Caused by: org.gradle.internal.exceptions.LocationAwareException: Unable to make protected void java.net.URLClassLoader.addURL(java.net.URL) accessible: module java.base does not “opens java.net” to unnamed module @6740e13b

This time it created the project on disk and merely didn’t import it. Importing had the same problem though. There is at least one known error with Java 9 and Buildship. And I’m getting a Java 9 error so clearly, I still have something pointing to Java 9 on system.

What actually worked

Running java -version showed I had Java 9 as my system default. This is because Mac defaults to the latest version. I didn’t have a problem earlier because Eclipse itself was set to use Java 8. (except when I’m playing with Java 9.)

I actually had to disable Java 9 on the Mac so it would recognize Java 8 as the default. This post shares how:

  1. cd /Library/Java/JavaVirtualMachines
  2. cd into my Java 9 directory
  3. cd contents
  4. mv Info.plist Info.plist.disabled
  5. Restart Eclipse

And a quick review of Gradle/Buildship

  1. You can intersperse running command line gradle commands and using Buildship. Since everything is stored in the gradle directories, they remember state from each other.
  2. To run “gradle clean” or “gradle build” in Buildship the first time:
    1. Go to the Gradle Tasks view
    2. Expand project
    3. Expand build
    4. Right click clean (or build)
    5. The Gradle Executions view shows what is still running
    6. The Console view shows the command line output
  3. To run “gradle clean” or “gradle build” in BuildShip the second time:
    1. Buildship automatically creates a run configuration for any builds you run. They have clear names (ex: atlanta-tourism – clean”) so you can easily find the right one. You can sticky common ones to the top since they are normal Eclipse run configurations
  4. To delete the whole gradle cache: rm /Users/xxx/.gradle/caches
  5. To delete a specific artifact rm /Users/nyjeanne/.gradle/caches/modules-2/files-2.1/… (I forgot to include a dependency and seeing everything re-downloaded helped)


eclipse oxygen (4.7.1.a) for the mac for the third time

I had downloaded Eclipse Oxygen when it came out in June. Then I downloaded the September version for early Java 9 support along with the JUnit 5 add on for the JavaOne Hands On Lab I delivered. This required downloading the Eclipse plugin. I’m giving a similar/longer JUnit 5 lab at DevNexus this month. It makes sense to start with a clean version for students to install. Therefore I decided to install Eclipse Oxygen for the third time.

This time I downloaded the December release of Oxygen (4.7.1a). It includes JUnit 5 and Java 9 support.

Installing

I downloaded Eclipse and chose “Eclipse IDE for Java Developers” from the wizard.

Opening Eclipse, I confirmed that I was using the December 2017 package.

Installing the plugins

The significant plugins I chose to re-install are listed in this table. eGit, Buildship (for Gradle), m2e (Maven) and I think EclEmma were already installed without me doing anything.

Plugin Purpose
Eclipse Tomcat Plugin One click launch for recent versions of Tomcat. Both are listed as being successors to Sysdeo. While both seem fine, I went with the “Eclipse Tomcat Plugin” that I had before updating Oxygen.
SonarLint  I use SonarLint daily to look for errors in my code.
Subclipse I got errors installing Subversive last time and switched to Subclipse.
Eclipse Memory Analyzer For finding memory leaks. Unlike last year with Neon, it installed cleanly from Eclipse Marketplace.
Freemarker IDE Freemarker syntax highlighting and macro assistance.


Pydev Python plugin/perspective
Contrast To spot potential security issues. See my impressions of the Contrast plugin.
Bytecode Outline I’ve been looking at bytecode a good fit for the book to make sure I understand why things are happening. This plugin makes it easy. I first tried Bytecode Visualizer but install failed. (The website says there were 25 failed installs with the same dependency problem in the last 7 days). After installing Bytecode Outline, I realized this was the one I had installed for Luna anyway.
Pitclipse For mutation testing coverage