I’ve used Gradle before although not a ton. For example, I compared eGradle and Buildship here. It’s been a while though. Which means my laptop setup has changed enough for it to be an adventure. (and not everything I needed to know was in my memory).
Eclipse Oxygen comes with Gradle installed so I thought this would be easy. And if I had never installed Java 9 on my computer, that would have been the case. After all, you just need to run: File > New > Gradle Project
The original problem
I tried that and got this error:
org.gradle.tooling.GradleConnectionException: Could not fetch model of type ‘BuildEnvironment’ using Gradle distribution ‘https://services.gradle.org/distributions/gradle-3.5-bin.zip’.
…
Caused by: java.lang.reflect.InaccessibleObjectException: Unable to make protected java.lang.Package[] java.lang.ClassLoader.getPackages() accessible: module java.base does not “opens java.lang” to unnamed module @2e59aa
I got a similar error when trying to import an existing Gradle project. I have Gradle installed on the command line and it works fine.
What didn’t work
I want to be using Java 8. I tried the following things that didn’t help:
- Change eclipse.ini to use Java 8
- Remove all Java 9 JDKs from the Eclipse workspace preferences.
- Adding a system JAVA_HOME environment variable pointing to Java 8
- This workaround editing the build.gradle file
- A new workspace (my teammate teases me that my workspace was around when Obama got elected – I often do an upgrade in place)
- Gradle code for Eclipse
- Checked my versions against what is known to work. I do have Buildship 2.2+ (2.2.1) and Gradle 4.3+ (gradle 4.5).
- Re-installing Eclipse and not installing/updating any plugins
Updating the plugin
Then I updated the Buildship plugin in Eclipse. Since I had done this in the past, I had to:
- Delete the Buildship update site
- Re-add the current update site. (Thanks to this post for the suggestion)
- Update plugin
- Restart Eclipse
That “helped” in that I got a different error:
Caused by: org.gradle.internal.exceptions.LocationAwareException: Unable to make protected void java.net.URLClassLoader.addURL(java.net.URL) accessible: module java.base does not “opens java.net” to unnamed module @6740e13b
This time it created the project on disk and merely didn’t import it. Importing had the same problem though. There is at least one known error with Java 9 and Buildship. And I’m getting a Java 9 error so clearly, I still have something pointing to Java 9 on system.
What actually worked
Running java -version showed I had Java 9 as my system default. This is because Mac defaults to the latest version. I didn’t have a problem earlier because Eclipse itself was set to use Java 8. (except when I’m playing with Java 9.)
I actually had to disable Java 9 on the Mac so it would recognize Java 8 as the default. This post shares how:
- cd /Library/Java/JavaVirtualMachines
- cd into my Java 9 directory
- cd contents
- mv Info.plist Info.plist.disabled
- Restart Eclipse
And a quick review of Gradle/Buildship
- You can intersperse running command line gradle commands and using Buildship. Since everything is stored in the gradle directories, they remember state from each other.
- To run “gradle clean” or “gradle build” in Buildship the first time:
- Go to the Gradle Tasks view
- Expand project
- Expand build
- Right click clean (or build)
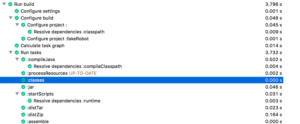
- The Gradle Executions view shows what is still running
- The Console view shows the command line output
- To run “gradle clean” or “gradle build” in BuildShip the second time:
- Buildship automatically creates a run configuration for any builds you run. They have clear names (ex: atlanta-tourism – clean”) so you can easily find the right one. You can sticky common ones to the top since they are normal Eclipse run configurations
- To delete the whole gradle cache: rm /Users/xxx/.gradle/caches
- To delete a specific artifact rm /Users/nyjeanne/.gradle/caches/modules-2/files-2.1/… (I forgot to include a dependency and seeing everything re-downloaded helped)