first impressions of VS Code (visual studio code)

FIRST Robotics is using VS (Visual Studio) Code as the default IDE next year so I’ve developed a sudden interest in learning it :).

My overall impressions

It is much faster to get started with VS (Visual Studio) Code than Eclipse. And for the simplified use cases for FIRST robotics this makes sense.

Initial install

I installed it about two months ago. That was easy. I went to the website and downloaded. I didn’t have time to do anything then so my only experience was when I double clicked a .java file when preparing for my QCon Java 11 presentation. It’s a nice editor so cool that it opened out of the box. Not so cool that it changed my defaults for opening files without telling me.

Also nice that VS Code prompts with a suggestion to install the Java extension pack when I opened the Java file.

Upgrading

Since I didn’t do anything, the first order of business was to upgrade to the latest version. VS Code makes this easy. One  a Mac, you go to code > check for updates. It downloads quietly in the background. Then you go back to Code and choose restart to download.

Like Eclipse, the release notes automatically open. However, since I’m completely new to the tool, everything is new to me so I didn’t read it.

Plugins

The FIRST website suggests some plugins. To start with, I installed:

  • Java extension pack – includes the plugin for Maven
  • C++
  • WPILib – this is a custom download (vs being part of marketplace at this time).

I like that it uses a Marketplace like Eclipse. I also like that you just click “reload” to have the downloaded plugins take effect (rather than having to restart the whole IDE). I also like that the extensions menu has an install from VSIX option. Really easy to install a plugin that you downloaded from the internet.

I’ll install more plugins after getting the lay of the land.

Documentation

The VS Code getting started is good. I like that it includes the keyboard shortcuts for opening the command palette.

  • shift+command+P = mac
  • shift+ctrl+P = windows

It was harder to find the windows keyboard shortcuts than expected. The website help “knows” I’m on a Mac so tells me about the Mac ones. But I’m going to be helping students on multiple operating systems. (It was clear in the FIRST robotics docs, but I would have liked this to be clear on the Microsoft website as well)

Creating a first project

I used the WPI wizard to create a new project. It was easy to use and fast. The file structure is standard for a Gradle project so it felt familiar. I opened the Robot.java file and tried to make a change. Then VS Code started “downloading the internet.” This is also normal for Gradle. I was just expecting it to happen on file creation or first build rather than when I pressed ctrl+space for autocomplete.

I like that you can use the command palette to run commands without having to use the mouse or memorize a lot of keyboard shortcuts.

Playing a little

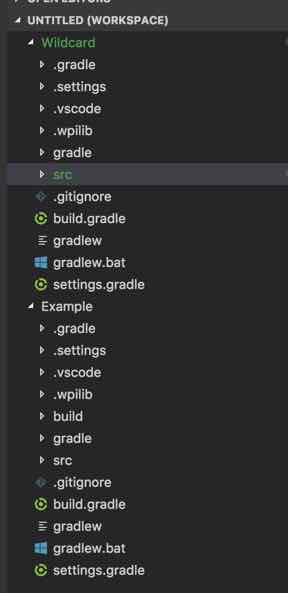
Many of the keyboard shortcuts are standard so autocomplete and closing tabs works as expected. If a file has warnings it (and the package name) are in green. Similarly, errors are in red. I imagine this is customizable if someone is red/green colorblind. I’m surprised the defaults are ones where this is a problem.

How to open multiple projects

I immediately wanted to compare two projects in the same workspace. This is easy. You go to file > add folder to workspace. This creates a “multi root” project.


ant and junit 5

Ant now supports JUnit 5. The CodeRanch software uses Ant (because internet connections vary around the world). This blog post describes how I upgraded.

What isn’t supported

While doing this, I learned that not everything supported in JUnit 4 for Ant is currently supported with JUnit5. In particular:

Preparing my environment

Updating Jars for Ant

Ant’s JUnitLauncher page gives a list of the required jars. I decided to download them directly from a Maven repository rather than using the copies in my local repository so I have the latest ones. I grabbed the jars needed for both JUnit 4 and 5 so I could test transitioning.

  • junit-platform-commons.jar
  • junit-platform-engine.jar
  • junit-platform-launcher.jar
  • opentest4j.jar
  • junit-vintage-engine.jar
  • junit-jupiter-api.jar
  • junit-jupiter-engine.jar
  • junit-jupiter-params.jar (I do a lot of junit parameterized testing)
  • apiguardian-api (dependency for junit parameterized testing)
  • junit.jar (use legacy junit jar for migration)
  • hamcrest-all.jar (not sure why needed now and not before)

I copied all these jars to the lib directory of my Ant install. If you forgot to do this before the next step, update the Eclipse preferences again now. Otherwise, you will get this message when running a build.

java.lang.NoClassDefFoundError: org/junit/platform/launcher/core/LauncherFactory

Switch Eclipse to the JUnit 5 runner but run JUnit 4 tests

This is easy.

  • Updated Eclipse preferences to point to it (Ant > Runtime – Ant Home)
  • Add the JUnit 5 library to your project’s classpath
  • Run > Run Configurations
  • Select the launch config for your test runner(s)
  • Change the test runner pull down to select JUnit 5
  • Observe the tests still pass

Switch Ant to the JUnit 5 runner but run JUnit 4 tests

Unlike Eclipse, this is not easy.

Updated Ant file

    • removed JaCoco wrapper for JUnit Ant task (was using this to give Sonar the test coverage – need to investigate the replacement)
    • removed code for setting custom system property – replaced with code described in setting System Property blog post
    • replaced the <junit> tags with <junitlauncher> tags
    • removed the attributes that are not supported by the new tag: showoutput=”no” fork=”yes” forkmode=”once”
    • changed printsummary attribute value from “yes” to “true”
    • replace batchtest tag with testclasses tag and change attribute to outputdir
    • switch formatter tag to listener tag using new attributes
    • added to nested classpath in junitlauncher task <pathelement location=”${junit.jars.dir}”/>
    • changed fileset to use .class instead of .java in matching
    • removed code to pass in all existing system properties. (since JUnit being run in the same VM, this is no longer necessary)
      <!-- Pass along all the system properties to the junit task -->
      <syspropertyset>
        <propertyref builtin="all"/>
        </syspropertyset>
      

Actually migrating the code to JUnit 5

While JUnit 5 can run JUnit 5 tests, I decided to migrate them all.

  1. Migrate core assertions/imports
    1. Ran the program I wrote to migrate most of the pieces.

Migrating the unit tests

  1. Created launch configurations to replace old runners
    1. Removed “all test runner”. Can do this in modern IDEs without the old Classpath Suite
    2. Right clicked Eclipse project and choose run as junit test. Saved this as my new JUnit 5 launch config favorite so can run all tests in one click.
    3. Repeated right clicking /src/test/java (we have separate folders for unit and integration tests) to create a launch config for only unit tests). I should change this to the Maven naming convention of IT
  2. Migrated Mockito code (we had about 50 affected classes in JForum)
    1. In Eclipse project, did search for @RunWith(MockitoJUnitRunner.class) and @RunWith(MockitoJUnitRunner.Silent.class)
    2. Right click in search view > Replace All
    3. Replace with: @ExtendWith(MockitoExtension.class)
    4. Right click project > Source > Organize imports
  3. Migrated parameterized tests by hand (we only had 1)
  4. Migrated the one test with a timeout by hand
  5. Removed a custom assertArrayEquals() method we had written (presumably before JUnit had it). The migration program changed the order of parameters in the method call, but not the custom method so it didn’t compile.
  6. Changed one assertThat manually. It was using a matcher in an odd way.
  7. Now that the code compiles, ran the unit tests. 43/2416 failed.
  8. We were missing a setup call to load a property file in a commonly used superclass. (This appeared to work before due to a different order of test runs). Fixing that one test brought it to 19 failures.
  9. The remembered I forgot to migrated tests that used (expected=MyException.class) to use the new assertions – found these by searching for FIXME). That was the rest.
  10. Finally, I had two tests that relied on special encoding which the converter program broke. I rolled back these parts manually.

Migrating the integration tests

  1. We add a JUnit Runner for all our functional test. It loaded an in memory database (or real database depending on your configuration). I migrated this to an extension. The code is a lot clearer as an extension which is nice.
  2. Then I search/replaced @RunWith(JavaRanchFunctionalTestRunner.class) with @ExtendWith(CodeRanchFunctionalTestExtension.class) and did an organized imports on the folder for the functional tests.

Removing JUnit 4

After migrating, I removed JUnit 4 and the vintage engine from:

  • Eclipse project classpath
  • Jar file in project
  • Ant install’s lib directory


good security – warnings in project

Cloudbees puts out security alerts frequently for Jenkins. We didn’t patch at CodeRanch for a while and then it got overwhelming. I wanted to get the latest JUnit plugin today. After upgrading to the latest Jenkins core, I went to manage Jenkins and saw this.

I was pleased. The product itself reminded me that we should check our security settings. It also reminded of all the security alerts that we missed.

We are now up to date (as of this moment) and it took less than hour. If I wasn’t counting the Jenkins core install and test, it would have been even less.