openscad – a cross between programming and cad – with AI

I’m making a birthday present that is a 3D printed object. It’s for someone who has everything she could possibly want so I’m going with something that has meaning. I’ve made simple 3D objects in TinkerCad. I’ve made minor customizations to things on thingiverse. I don’t have the artistic skill to make what I want here. (Not saying what it is because I want to actual present to be a surprise).

I was thinking about paying one of the members of StuyPulse robotics to create a stl file for me. But I also wanted to make it. I asked ChatGPT for ideas in hopes that there was an AI plugin that could help me. There was something even better!

OpenSCAD

ChatGPT is able to create documents in the format used by openscad.org. This is an open source CAD modeler. And the best part is that you use a text based programming language to specify what you want so my hand eye coordination when it comes to art is a non-factor!

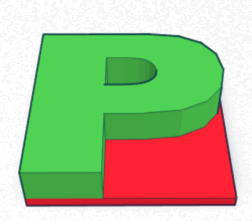
For example, this is a part of my final product. I can control all the variables (and the text) in c code. I’m a programmer; I’m good at that. (ChatGPT did not give me the heart; it did get me started with how to get text in the desired location. I am perfectly capabie of entering a Unicode heart myself)

    translate([0,0,base_thickness - text_depth])
        linear_extrude(height=text_depth)
        text(
            "♥︎︎",
            size=24,
            halign="center",
            valign="center",
            font="Liberation Sans:style=Bold"
        );

What do i think of the tool?

I love the rapid preview feature. It’s poor quality rendering (lots of random extra lines), but let me quickly try things to get what I wanted. Then you have to render it which takes forever. Luckily, the tool makes a chime when done because I had plenty of time to start doing something else and forget about it. After that, exporting to an STL was fast.

I looked at reviews online and they were mixed. The people who were unhappy with it felt it wasn’t powerful enough for their needs. It was perfect for mine.

Using AI to help me

Using AI as a pair programmer here was super helpful. Remember I hadn’t even heard of this tool until I started this project. And its not a language I feel the need to become an expert in. AI was able to get me started and suggesting things I might want to do next. It was able to teach me how to change the code for some of the changes. (Which was enough for me to make other changes without AI.) I wound up doing a large number of edit/preview cycles which is how i code – tiny increments and see where things stand. I like that I didn’t one shot the cad because I still feel like I was involved in the coding process. And I did write some code by hand which is satisfying to me. Plus this came way better than if I had tried to do it by hand in TinkerCad. I was able to customize one of the key modules to have a better shape than that AI came up with.

I did three full render/generate stl cycles to see what it looked like and edited by hand until satisfied. The final product is bigger than my personal 3D printer can handle so I sent it to VoodooMfg for printing. (This also allows me to use a material I don’t own so it can be a little stronger). I’ve used them in the past for this type of thing and am satisfied with the result. Also, they are in New York City (Brooklyn to be specific) which means even the cheapest shipping with USPS is pretty fast). Fun fact: many years ago used to be an option to pick up your print in person. It was so cool to see their factory with so many 3D prints!

What I’m paying to print it costs about what I’d have spent on a gift. But this is so much more meaningful!

M3d+ (Micro3D Plus)

I bought a M3D printer earlier in the year. M3D offered an inexpensive trade in for the Micro Plus.

FedEx the original

They sent a FedEx label where FedEx lost the package. Seriously, here’s what happened:

  • Drop up from my neighborhood Fed Ex store over weekend (in September)
  • Picked up (the following Monday)
  • Arrived at FedEx location in Long Island City (that same Monday)
  • Left FedEx origin facility in Long Island City (that same Monday)
  • And then nothing. It disappeared in their possession.

I didn’t notice for a while because I assumed it would take a number of weeks for M3D to send the new one. They had a lot of trade ins to deal with after all. Then I had two trips and wasn’t home. When I got home and still no printer, I checked on the status and learned it was missing. I filed a FedEx claim and also emailed M3D asking what to do. After all, I’d be out the upgrade fee if I had to buy a new one with the FedEx claim. And be printer-less for even longer.

M3D was awesome. They sent me the upgraded model from the trade in without having received the original. So now I have my new printer and am still waiting to hear back from FedEx. They can send M3D a check when the finally get around to it!

Setup

There’s different software for the Micro+ so I reinstalled. It no longer says the software is beta.  They still don’t sign the software. I had to do “control open” on my Mac because it said the software was from an unidentified developer. After plugging it, I got prompted to update the firmware on the printer.

The printer verifies you removed the gantry clips and guides you through inserting the “ink.” Unlike the old model, I got prompted with two questions:

  1. Is the roll of filament micro and pro? I picked micro. (but it is really a third party larger roll)
  2. Is the roll new? I picked no. The printer said it didn’t remember the roll so would treat as new,

I’m a little worried that the printer remembering how much filament is left is going to be a problem since I am using third party filament. The printer will think the roll is done, but it won’t be. Since I don’t print more than a micro sized roll in one shot, I think I’ll just always pick new.

Like last time, it took three tries for the filament to come out. There was a bubble at first, but no white initial filament.

On my first job, the filament was printing only little thin stringy segments. I realized that instead of white initial filament, it was black factory filament as a default. Since I was testing with black/gray, I didn’t notice right away. After I removed/inserted a few times, it ran through that initial test filament and all was well.

My mistake in testing

I didn’t read the instructions because I’ve been using the old M3D and “knew” what to do. I forgot to do the initial calibration with the new printer. Oops. That explains why my first few tests failed. It took a calibration and two test borders before the output became normal.

Testing

The Micro Plus has some new features. You can clone the model to print more than one in a shot (presuming it is small.) You can set custom quality profiles. You can save print jobs with your configuration.

And it has untethered printing! It’s an option you can check off in a print job. Now the first step is that the software saves the job to the printer itself. Then it does the usual processing/calibrating/printing.

The untethered printing is listed a development feature rather than a full fledged feature. But it works. If you untether from your laptop, it continues printing. If you plug back in the USB, it gives you the status on percentage/time to completion.

One thing I noticed is that “reset” is where you’d expect an “ok” button to be and print is all the way on the left. That’ll take a few tries to get used to!

The results

I printed using M3D filament and third party filament. Both worked the same way as on my old printer after calibration. Except that I can use my computer without being near the printer while printing long jobs. And that is awesome!


my second 3D print

After completing my test run, I didn’t have a lot of time so I wanted to start with something simple. Preferably one I could use as gift on an upcoming vacation.

I had taken a class a year or two on the basics of 3D printing which used TinkerCAD. I like that it is free and easy to use. I’ve forgotten most of what I’ve learned so will get to relearn when I have more time. I did remember enough to assemble two simple objects together. It seemed good enough for a first print. Here’s the design:

TinkerCAD lets you download a .stl file so I was all set to print. Actually printing it, I learned a few things about the software:

  • There’s a size option when printing. I thought it was inches. It’s not. It’s scale. I printed a bit bigger than I wanted, but that’s ok.
  • The abort button doesn’t work. Nor does the emergency stop. What does work is killing the power or unplugging the printer.
  • Closing the software doesn’t work on Mac. Force quit does. I’m not sure if this is a problem with the software or with Mono.
  • The status screen doesn’t let you command tab to it. Instead you have to do the show all windows thing to get to it.

It took a few hours to print (this printer is small so therefore less speedy than some others). It was tricky to get off the bottom of the printer bed. Online suggested a scraping tool. I couldn’t get it with a putty knife. What worked was a nail file.

And the result: