Pathways 2019 changes

There have been a number of changes to Toastmasters Pathways in 2019. This is one of the benefits of an electronic program.

Some highlights:

  • The Engaging Humor path is new. I’ve updated the Presentation comparing paths to include it.
  • The “Reflect on your Path” project is no longer part of level 5. It is now a separate “Path Completion” level. This means that level 5 is now one required project and one elective.
  • You can now both view and give speeches in any order. This is great news. It makes the 90 day option to change a path useful as you can browse. (Just don’t mark any projects complete until you are sure you want the path.) Additionally, you can give a “later” speech to work on a skill you need now.

toastmasters pathways – how to see what your members are up to

Sept 2019 update: The percentage is now on report 2 (the level progress tab). The percentages have changed slightly as well. See the updated post:

toastmasters pathways – how to see what your members are up to – part 2

In Pathways, three Toastmasters officers are able to access Base Camp Manager. They can view individual progress. For example, this bar chart shows how many members my club has currently working on level 2. (If you don’t see anything in your bar chart, refresh.)

I knew you could click the little arrow and view details (in a browser) or export to Excel to see which members are on which paths.
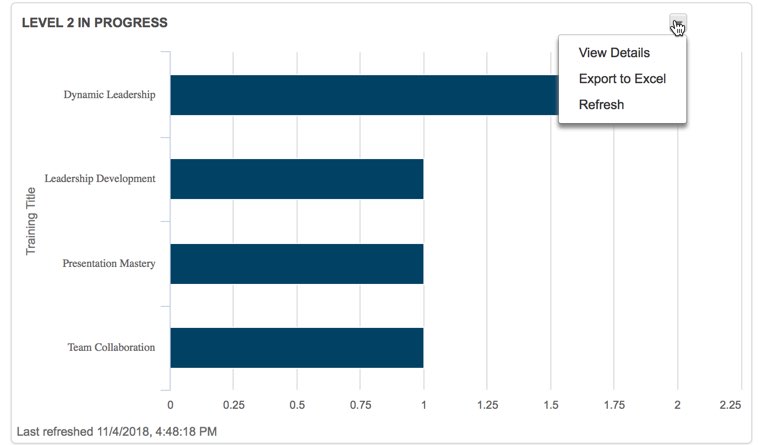
However, I didn’t realize you could tell how many projects they did within that level until yesterday. A big thanks to Cambria Heights Toastmasters for saying “what’s that” when I was demoing.

When you log in as a member, you see two percentages:

  1. The percentage complete within a level.
  2. The percentage complete within a path (aka across all five levels)

What do the percentages mean? (If you don’t like math, skip to the table at the end)

Ok, so what does this mean? Suppose a member has completed the Icebreaker and Evaluation/Feedback projects in level 1. This member has two projects remaining in level 1 (Research/Presenting and Level Completion.)

Therefore the member is 50% done with level 1. The member is also 10% done with the path. (Completing the full level would mean being 20% done with the path since one of five levels would be complete. Since the member completed half of level 1, the member completed half of 20%. Which means the member is 10% done with the path.)

Let’s try another example

In the screenshot above, we have three members at 20% done with the path. These members completed level 1 but did not complete any level 2 projects. We also have one member 25% done with the path. This member completed one level 2 project. (Remember 20% means completed level 1 and 40% means completed level 2.)

Can i just have a reference without doing math?

Sure

Percentage What it means
0% Signed up for a path, but didn’t do the icebreaker yet
5% Completed the icebreaker
10% Completed two projects in level 1
15% Completed all the projects in level 1 but needs to submit the level completion (or have it approved)
20% Completed level 1, but hasn’t yet done any projects in level 2
25% Completed one level 2 project
30% Completed two level 2 projects
35% Completed all level 2 projects but needs to submit the level completion (or have it approved)
40% Completed level 2, but hasn’t yet done any projects in level 3
45% Completed one level 3 project
50% Completed two level 3 projects
55% Completed all level 3 projects but needs to submit the level completion (or have it approved)
60% Completed level 3, but hasn’t yet done any projects in level 4
66% Completed one level 4 project
73% Completed all level 4 projects but needs to submit the level completion (or have it approved)
80% Completed level 4, but hasn’t yet done any projects in level 5
85% Completed one level 5 project
90% Completed two level 5 projects
95% Completed all level 5 projects but needs to submit the level completion (or have it approved)
100% Completed level 5; path complete!

creating my first video

When I was at Oracle Code New York in March, Bob Rhubart asked me if I’d be up for creating a “two minute tech tip”. It’s a two minute video that you record yourself presenting a tip tip. I said I’d think about it. I didn’t do anything with it.

I wasn’t worried about content. I’m a Toastmaster. We do 1-2 minute talks frequently for practice. They are called Table Topics. With the two minute tech tip, I’d get to pick the topic so in that respect it is easier.

So what prevented me from actually creating the video? There were three things:

  1. I’ve never liked watching myself on video. And I’m better when I can at least pretend I don’t know I’m being recorded. Looking at the camera doesn’t help with that.
  2. I’d never created a video using my computer and didn’t know how.
  3. I live in a studio apartment in New York City. As you might imagine, these apartments aren’t known for having lots of space. Which means I frequently need to move things. I figured creating a video would be a lot of moving things around.

Now that I’m speaking at Oracle Code One, Bob asked again. This time about a video interview and/or a two minute tech tip. Since Oracle listed me as a featured speaker, me being too lazy to deal with problem 2 and 3 feels like a weak argument! And problem #1 is just something I have to live with. I haven’t let it prevent me from having conference sessions recorded so this is no different.

Creating a video

Creating a video (at least on Mac), turned out to be really easy. QuickTime Player has a “new movie recording” option. It really was as easy as sliding the webcam cover over so I don’t have a solid black image and pressing record. That was a silly thing to have as an impediment. It was a non-issue.

Getting ready

I also overestimated the complexity of getting ready in my mind. When I do a Skype video call with a friend or even my teammates, I just turn on the camera and go. That’s not what I want on youtube though. Luckily, it wasn’t that different. What I did:

  1. Move my five foot tall oscillating fan so it isn’t in the background. I don’t think it is terrible to have this in the background, but it wasn’t a big deal to move. (I also had to move two things in front of it to get to it.
  2. Move a couple of things on my eating area table so they aren’t in the frame. The napkin holder created glare, so this actually was necessary.
  3. Angle the laptop two inches to get the wall of the eating area table out of the frame. This made the background solid instead of a light switch and (two different colors.)
  4. Move my chair two inches so my head/body is covering the lamp behind me.
  5. Adjust lighting – during the day, having the lamp behind me off and the table lamp on was just perfect.
  6. Clear off table so don’t see papers on it (this allows my head to be in the middle of the camera angle)