managing my inbox

Email overload!  Must change something.

Before

Up through November, I thought I had decently organized my gmail.  I had filters set up to direct certain kinds of mail to labels that could be read on demand/on the weekend/etc.  I was able to find most things that stayed in my inbox.  I did have a constantly growing inbox size, but it didn’t bother me.

The problem

Early this fall, I took a number of flights within six weeks.  My system sputtered and fell apart from that.  I learned I didn’t have a way to deal with “I’ll do that later” things.  I had been using gmail’s star for that, but there were too many.  When I got home from each trip, I had dozens of starred items and countless more I hadn’t even read/processed.  My inbox size shot up so I couldn’t find things.  I didn’t have a clear picture of what needed doing.  Clearly something needed to change.

What I tried – Active Inbox (Getting Things Done)

The first thing I tried was ActiveInbox‘s Getting Things Done style plugin to gmail.  Basically, you move each e-mail from your inbox to a state (action/waiting/someday/etc) and a project(javaranch/robots/blog/etc).  This gets them out of your inbox and into an organized state.  The plugin also contains some helper features like integrated access to previous mails to that person

What I liked:

  1. Forcing me to have flow
  2. Reminding me to get stuff out of the inbox
  3. Getting me in the habit of having flow

What I didn’t like:

  1. Gmail filters only let you automatically direct e-mail to  one label.  This means my filters are sending things to “S/Action/Robots” but not “P/Robots”.
  2. Gmail was very intermittent about showing me the ActiveInbox tree to view mails and the normal list of labels.  When the tree was showing, I had trouble viewing things because I couldn’t view the categories I created under “S/Action” individually.  I could only read “S/Action” in one fell swoop.
  3. When on another computer, ActiveInbox isn’t there and you have to choose the labels you want manually.

Overall impressions:

  • Active Inbox got me more organized.
  • Active Inbox trained me to think about state in my personal mail.
  • Problem #1 is bothering me too much to continue using Active Inbox, but I am creating state based labels and using them instead.

In other words, I used Active Inbox as training wheels for a bike.

What I tried – 0boxer (Zero Inbox)

While I still had Active Inbox installed, I tried the 0boxer game.  The game has a banner on top of your gmail that tells how many points you have.  It is supposed to motivate you to get to zero mails in you inbox.

What I liked:

  1. Blatant reminder to go through mails
  2. Counts of how well you do each day

What I didn’t like:

  1. It slowed down my gmail noticably.
  2. It said I got to zero inbox when I hadn’t.

Overall impressions:

0boxer was a good way to go through my “legacy” e-mails.  With Active Inbox, I declared triage and said I would only manage e-mails received after September 22nd.  0boxer helped me go through those mails.  I did uninstall 0boxer after about 900 deletions due to the negative performance implications.

Where I am now

I’m actually in a comfortable state now.  I still have about 50 pre September “triage” e-mails left.  (out of about 200 originally.)  I have a system that is working for me.  It still involves the inbox/stars for very short term things.  But now I have a consistent number of post September e-mails in my inbox and an organized set of labels for time/type of things.  Active Inbox taught me the importance of using two labels for the same mail.  Even without Active Inbox, it really helped!
git plugins for eclipse and netbeans

Last year, I tried out Git for the first time.  The command line was fine, but I really like my version control to be integrated into my IDE.

Overview

Git shines at some things.  Aside from the common ones, it is useful when internet access is unreliable.  We take connectivity for granted.

NetBeans

I hadn’t tried the NetBeans plugin last year. I mainly use Eclipse and only use NetBeans when working with a local robotics team. As such, I haven’t used NetBeans in eight months and needed to update it before I could try installing the NetBeans Git plugin.

Note: This Git plugin is in experimental mode. It will likely stay there as Oracle is working on an official plugin. Check Oracle’s page for updates. (Nice to see they didn’t abandon NetBeans after taking over Sun.)

The install procedure to connect to an existing repository:

  • Tools > Plugins
  • Select available plugins tab
  • Search for git
  • Click checkbox next to nbgit
  • Click install
  • Next and agree to license
  • Install
  • Continue to acknowledge it isn’t a signed/trusted plugin
  • Finish
  • Close
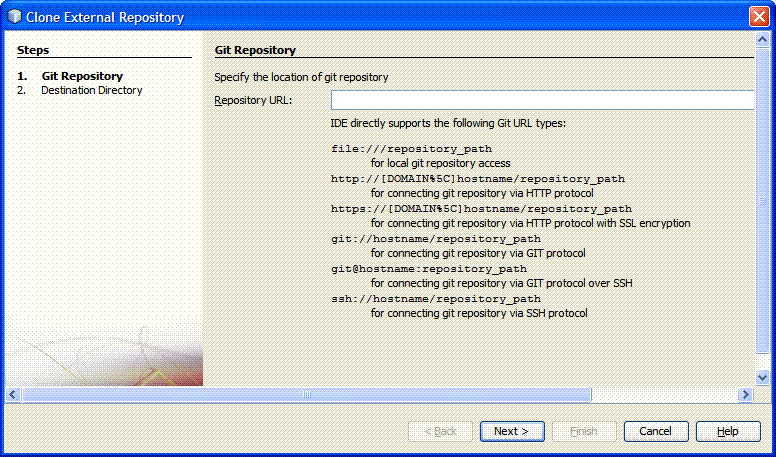
  • Team > Clone Other
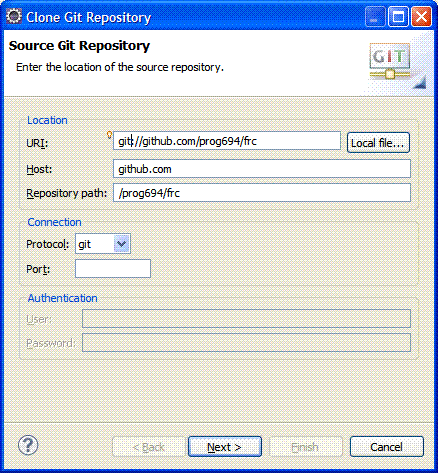
  • Enter URL of git://github.com/prog694/frc
  • Enter directory/clone name if want to change. I had to change the clone name since the default was in use from last year’s Subversion project.
  • NetBeans looks for projects in that repository. I got a pop-up saying 7 projects were found and was asked to click “open project.” Select one or more projects to open them.

Eclipse

I tried egit again. This didn’t go well last year.  It’s now a year later and I’m on Eclipse 3.6 (Helios) instead of 3.5.  Things went much better this time around.

The install procedure to connect to an existing repository:

  • In Eclipse, connect to the update site.
  • Download all available plugins (egit and jgit).
  • Eclipse restarts
  • Change to the Git browsing perspective
  • Choose “clone Git repository”
  • Enter the URI.  In my case it was git://github.com/prog694/frc.  Note this same repository is available in a browser at https://github.com/prog694/frc.  All I did was change the protocol to git to connect. 
  • Since this repository is open for public browsing, I do not need to supply a username and password
  • Click next
  • Click next again to select the master
  • Click finish
  • Wait a minute or two
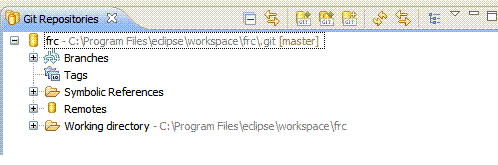
  • Expand until you find the project you want to checkout. (In this case, the actual project is a NetBeans project in this case so you can’t check it out as a project.  You can browse it in the repository view if you really want to check something.)

Conclusion

Both plugins are intuitive to use if you’ve a CVS/SVN plugin before.  Right click the project, choose “git” and the relevant option.  It’s nice to see the integration is seamless now.

visio uml 2 for java (scea)

After taking SCEA part 1 and Core Spring, it is time to work on SCEA part 2.  Or should I say Oracle Certified Master, Java EE 5 Enterprise Architect part 2.  OCMJEA?  It doesn’t matter.  This post isn’t about the SCEA/OCMJEA per se.  This post is about using Visio for current Java UML modeling.  Here’s what I learned or re-learned about Visio.

Why Visio?

You may be wondering why I chose Visio in the first place.  After all Star UML is free.  My original thought was that I have Visio 2002 installed on my machine because I bought a copy when I was in grad school and I am experienced in using it.  In hindsight this wasn’t the best idea.

UML 1 vs UML 2

Visio does not support UML 2.  The SCEA wants UML 2 diagrams.   It looks like the biggest differences are conditional support for sequence diagrams and a new shape for components in component diagrams.

Luckily there are UML 2 stencils for Visio for almost every version of Visio.  Installing them was easy.  It is key to install the stencil before you start creating diagrams as Visio UML shapes can’t integrate with a UML 2 stencil diagram.   The stencils don’t have much documentation, but I found this chart helpful.

Java stereotypes

To add new stereotypes for Java to a diagram, follow these steps to register them.  Then just select the relevant stereotype in your diagram.

  • UML menu > Stereotypes
  • New
  • Stereotype = @Entity (or whatever you want to add)
  • Baseclass = Class, Component or Dependency (depending on the type of diagram)

Java types

To add Java specific types, follow these steps to register them in your diagram.  Then select them in your attributes/operations/methods.

  • UML > Packages
  • New
  • Java types
  • UML > View > Model Explorer
  • Right click java types in model explorer > new >
  • datatype > name

Hiding attributes/operations section in a class diagram

  • Right click shape
  • Shape display options
  • under suppress, click attributes or options

Add documentation to shape in component diagram

  • Right click shape
  • Shape display options
  • Check properties
  • Can add custom property (or documentation) with more detail