I have a relative who is having trouble reading paper stuff. She’s fine on the computer because there is a ton of light and you can zoom as much as you want The library has a big table size digital magnifier. There are many smaller versions. We went with a less expensive version, at least at first. The Eyoyo Portable Digital Magnifier Electronic Reading Aid 5.0 inch. I had it shipped to me so I could try it since I’m going to be tech support.
This blog post is both a mini user manual for her and also to remind me what things looked like when I’m doing tech support and can’t see it. It does not cover all the features, only the ones she will be using. (We aren’t using a TF card/taking photos/etc)

Overall impressions
It was pretty easy to get started. Some of the functionality took some playing to figure out. But the gist was fast. The manual said you have to install the battery and charge it. Mine was already installed and charged.
Manual
It comes with a manual. The font is bigger than standard text (good for accessibility). Nowhere near as good as the magnifier itself of course. You can also email support@eyoyousa.com to get a PDF manual.It’s similar to the printed one but not the same. Oddly the names of each part are in Chinese with a legend for English. That’s hard to see if you are zoomed in a lot. The printed one is fully in English. (Not perfect grammar, but understandable)/
Turning on
Very important: They make a big deal about not having the device on when charging because it might get too hot/damaged. I don’t know if this is true, but I’m not disobeying that instruction to find out! I suspect it’s not terrible for a few seconds if you forget though.
Hold the red button on the top of the magnifier and count to two. (The manual says “seconds” but not how many. It was pretty fast.) When you see the welcome screen, you can let go. (The welcome screen is blue text on a white background. The background in the photo looks different because it is a photo of a screen.) The welcome screen is visible for about four seconds and then the device is ready to use.
Turning off
You turn it off the same way as you turn it on. Hold the red button on the top right for two seconds until you see a “Goodbye” message. That message will be visible for about two seconds and then the screen will go dark.
Important difference from a phone: When you don’t press anything on a phone, the screen goes off, but the phone is still on. If you don’t touch the magnifier for three minutes, it says “Goodbye” and turns itself off. There is only on and off. There is no mode where it can be a dark screen but still on. (Moving the magnifier counts as activity so this isn’t a problem when you are actually using it)
Battery usage
In the bottom right is an indicator that shows the amount of battery left. It started with three little rectangles. After a lot of use, I got it to two. (If you are actively using it to read, I’m sure the battery goes down faster. I was doing something else and trying to poke it every two minutes so it wouldn’t shut off and save battery. It took me three hours to get it to go down one rectangle because I kept forgetting to poke it and finding it off many minutes later. I wills ay the battery saver feature is a great one for someone actually using it though. You go to answer the phone and don’t find a drained battery!)
Charging
First make sure the device is off. If the screen is dark, you know it is off. Then plug in the charging wire in the top left. Note that it will not go in if you have it upside down. It goes here:
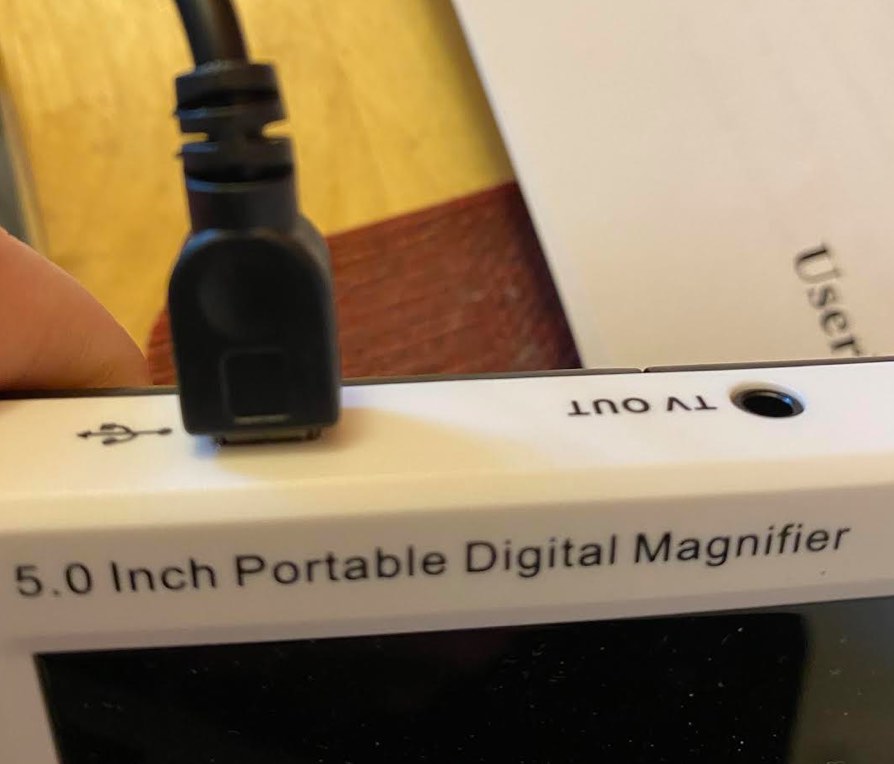
The correct way to put it in is so the larger version of the plug is down. Here’s a super zoomed in version. These are blurry because I zoomed in as much as I could
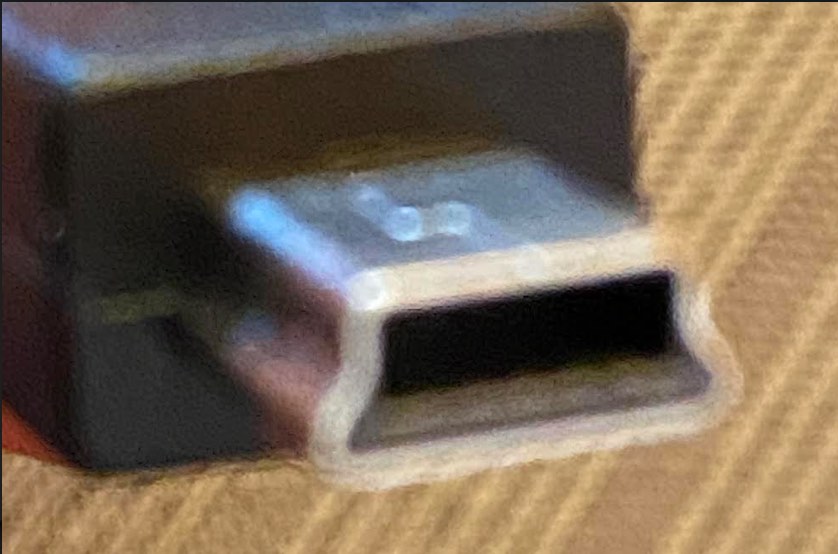

This feels like a struggle waiting to happen. These are both small when not zoomed in and the type of thing that she had trouble seeing in the past. There was a tiny wire indicator on the bottom side. However, i could barely see it; I assure you the target audience of the magnifier cannot!
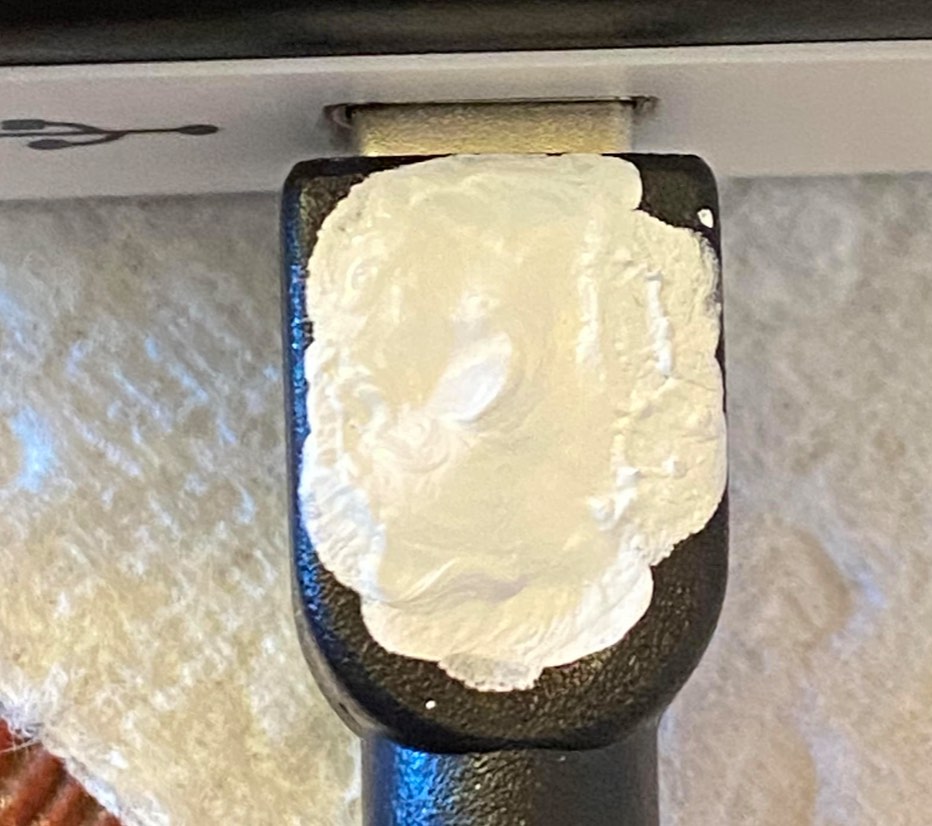
I solved that by painting the side not to use in whiteout. This is the device upside down. (We may use a sticker or something when I am there to cover the whiteout if she doesn’t like it. I worry a sticker will fall off because it is such a small space.
The other end of the charger is easy. It goes into a regular power outlet. (I already connected the charging wire to the charger)
Changing zoom
The default zoom is 4x. Every time you turn on the magnifier, it gets reset to 4x. You press the blue button on the top right of the device to change it. Each time you change, there is a loud beep. The choices cycle through: 4x/8x/16x/24x/32x. If you miss the one you want, keep going and it will go back to 4x after 32x.
Changing color
The default is Full Color. This is good for most things; at least with my eyesight. The setting is remembered when restarting (at least most of the time.) There are 16 other options. To change you have to cycle through them all.
- Full color
- Black on white
- White on black
- Cyan on black
- White on cyan
- Red on white
- White on red
- Yellow on black
- Black on yellow
- Blue on yellow
- Yellow on blue
- Blue on white
- White on blue
- Red on green
- Green on red
- Black on blue
- Blue on black
Changing brightness
This one isn’t intuitive. Without the manual, I never would have imagined it existed. Luckily, the default is level 5 (max) brightness so most people won’t need this feature. The setting is remembered after shutdown.
If you want to reduce the brightness (lighting) or put it back, hold the blue button on the bottom middle. Then press the top blue button on the front to make it brighter or the bottom blue button on the front to make it less bright. This works like the “shift” key on a computer. (Ex: You hold shift and press “a” to get “A”.
Flashlight
The manual says to hold power and zoom a long time to get a flashlight. I couldn’t figure this out. There seemed to be the same light whether I did power/zoom or just power. Didn’t buy this to be a flashlight specifically though so not worth any further investigation.
Using with TV
This is my favorite feature. Rather than zooming in even more, you can leave it on 4x (minimal) zoom and connect to a larger screen. This is also helpful because the magnifier has to lay flat on what you are reading. Which isn’t a good position to read for a long time. A monitor is likely to be better positioned.
Yes, a monitor. Not the tv. You need to be connected with a wire to the screen. Most people don’t have a table and chair so close to a tv. A computer desk on the other hand….
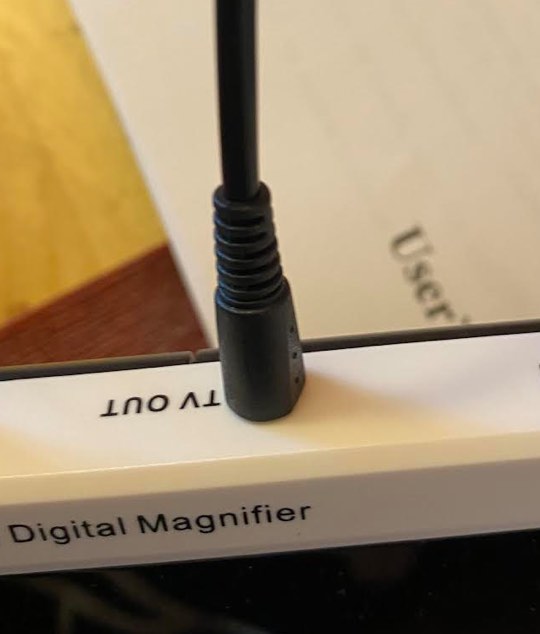
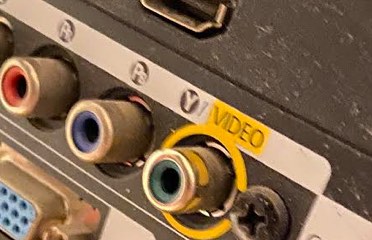
The black tv wire goes into the magnifier. It is a circle so direction doesn’t matter. What does matter is that you push it in all the way. I felt some resistance part of the way through and stopped. That is not the right place. (Tip: it goes in easier if you turn the black wire once you feel the resistance) It needs to be fully in/flat against the device. I plugged the yellow RCA cable into the video circle my computer monitor.
However, my computer monitor is a Samsung that was my old tv. The actual user of this has a proper computer monitor that was never a TV and therefore doesn’t have a RCA input. I went to Microcenter to check. They didn’t have a RCA to HDMI adapter but confirmed that’s what I need. So I bought it online.
If the computer also uses HDMI, this means unplugging between the computer and adapter. (The HDMI cable on the back of the monitor will still live plugged in.) If the computer uses DisplayPort, it will mean switching the source on the monitor.
Note that magnifier itself has a black screen when plugged in. It doesn’t display on both at the same time.
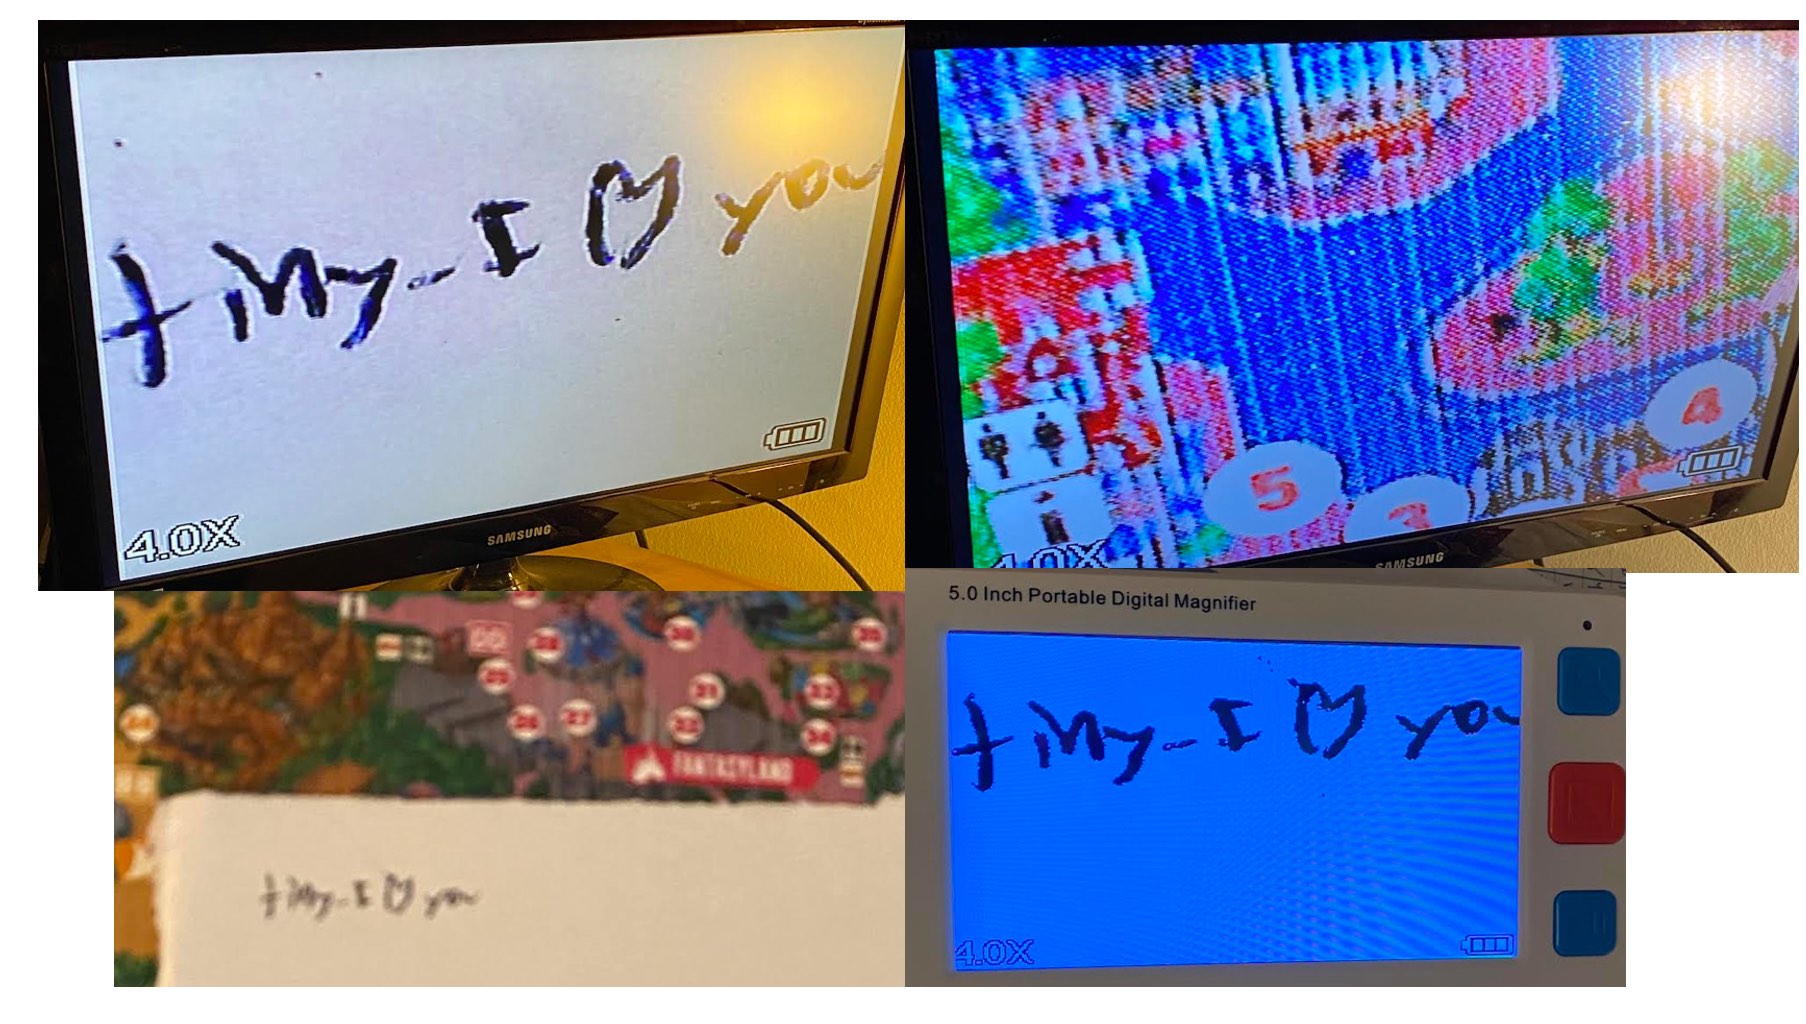
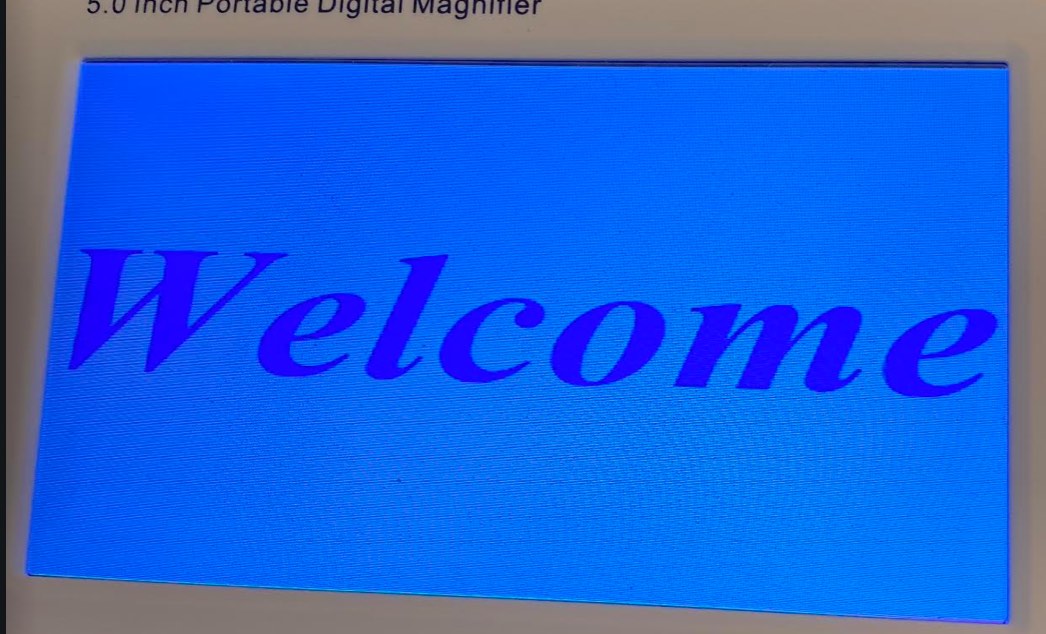
And finally, a stress test
Last, I tested it with some things that are hard to read. While it didn’t do quite as well on with printed material, I was impressed. I had taken a screenshot of the Disneyland map, and printed it. The top right images shows that on the computer monitor. The resolution is terrible on the printed copy. And you can see the white lines on the monitor. But you can also see the numbers. So ugly, but it works.
I also tried a handwritten note. I wrote at about the size of the image (which is smaller than a note, I would give a reasonable person to read, and wouldn’t even consider giving someone with poor vision. Both the device and monitor handled it just fine. On the monitor, you can see the letters start to get less sharp because it is written in pen. Printed materials of course don’t have this problem.