five hours of real coding in Visual Studio Code

I tried to code for real in Visual Studio Code for the first time. This means not just dealing with my first impressions, but actually trying to get something done. I spent five hours coding today. The project I was working on uses Maven, Selenium and JUnit 5.

I tried to *only* use VS Code for the five hours of coding I did today. Learning any new tool is frustrating. I didn’t complete the development task I wanted to. But I made a decent amount of progress. And more importantly, I have a better understanding of the VS Code environment.

What I re-learned

I learned these when I was playing last time. But this time, I used them a bunch.

  • Shift Command/Windows P – Lets you type in the name of what you want to do. Useful when you don’t know the keyboard shortcuts or location of anything! I used it a lot for organize imports!
  • F12 – drill down into a class

What I learned for the first time

  • F2 – renames a method
  • The left explorer view has a “Maven Projects” section. This provides a visual way to run Maven clean/install/etc. it also provides a visual way to run effective pom. Or at least it did until I disabled the Maven integration. See the “challenges” section for why.

What I liked

  • Running a junit test is easy. Click “run test” over the class name or method name. This causes the test to run and a green (or red) status to appear in the bottom left line with how it went.
  • A green check or red x also appears next to each test method which you can click to see the test result details.
  • Extract to method is easy. Just highlight the code and click the lightbulb.
  • The git integration is good. It is clear on how to pull/push/commit/stash
  • Typing code was relatively easy.

“Challenges”

  • F2 does not rename a class completely. It does rename the “public class” line. But it doesn’t rename the file. There was a github issue logged about this in August. It was closed because it was going to be resolved “soon”, but still seems to be a problem.
  • JUnit 5 tests in classes that end with *IT.java run normally but report as if they were skipped. This means integration is partial. If you open the test class, the green check or red x are correct. And the test explorer recognizes integration tests as tests. But the bottom bar status and test report show as skipped. I had to temporarily rename my test to *Test.java and name it back before committing for this to be usable. I reported this as an issue in the vscode-java-test project
  • There doesn’t appear to be an easy way to make the editor (the part where you type code) full screen. You can choose the command “Maximize editor group and hide sidebar”, but the problems/terminal/etc group is still at the bottom along with some visual clutter on the right. This means you actually have to drag stuff around. In Eclipse, you just double click the “title” and get full screen. More importantly, in Eclipse you double click again to get your original view back. This was requested back in 2016 so I doubt it will be added.
  • Printing something in JUnit doesn’t play well with the Maven integration. Seriously, even if you remember to switch the output tab to “test output”, nothing gets output. I quickly learned that I wasn’t the only one with this problem. It was also logged as a defect this month and sounds like it is being worked on. In the meantime, I disabled the Maven plugin. This isn’t terribly inconvenient because of the Terminal tab. I can still run a Maven build right from my editor.
  • You have to create packages and classes “manually.” This is annoying from deeply nested packages. It is also annoying to have to type the package declaration when creating a new class. This is because VS Code has the concept of folders/files vs packages/classes

What I had to fall back to Eclipse for

There were two tasks where I decided to use Eclipse rather than VS Code:

  1. I needed to paste a very long string. Eclipse adds the line breaks and string concatenation to make this elegant. VS Code does not. I could have spent 15 minutes doing it by hand, but I let Eclipse do it for me.
  2. Eclipse is really good at showing all the differences visually between two Strings in an assertion. (See #1 for my long string.) I could have read the text assertion to see the differences. But again, Eclipse is just so good at this.


eclipse photon (4.8) for the mac

eclipse.org went with a mountain peaks as the website theme for the release of Photon. Fun and fitting. The Eclipse site prompted me about the cookie use policy. Another change since last year, but not unexpected.

The matrix comparing the packages is still clear. The Java version is a subset of the Java EE version. I chose the later since it has the JavaScript tools built in. Unlike the last few years, a sponsored/commercial version wasn’t featured prominently. In fact, I didn’t notice one at all. Vaadin and JRebel do show as sponsored/promoted plugins in Eclipse Marketplace though so no risk forgetting about them!

Installing

I like to download and install a fresh Eclipse so I don’t have random plugins I’ve tried throughout the year. I downloaded the installer first which is a nice small, well relatively small, (55MB) file. I choose “Eclipse IDE for Java EE Developers” and an installation folder. This took a few minutes. I saw messages go by about it being slower than usual to download Eclipse plugins from various servers. Presumably because Photon has only been out a few days and lots of people are downloading.

I got a prompt from Oomph to accept /plugins/org.eclipse.rse.ui_3.3… as unsigned content. I accepted, but was a little surprised.

Then I was able to open Eclipse


Installing the plugins

Already installed were:

  • m2e (maven)
  • BuildShip (gradle)
  • EclEmma (code coverage)
  • JUnit (3, 4 and 5)
  • eGit (git)

The significant plugins I chose to re-install are listed in this table.

Plugin Purpose
Eclipse Tomcat Plugin One click launch for recent versions of Tomcat. (This is the successor to Sysdeo and Mongrel)

Problem/resolution

I got a PKIX error. But clicking through it still allowed me to install so I didn’t have to update the certs or anything.

Unable to read repository at https://devtools.his.de/tomcatplugin/updatesite/content.xml.

sun.security.validator.ValidatorException: PKIX path building failed: sun.security.provider.certpath.SunCertPathBuilderException: unable to find valid certification path to requested target

This is a known issue. In my case, it was caused by the eclipse.ini automatically picking up my Java 11 early access install. After changing it to point to Java 8, things went better. This allowed it to pick up the cryptography jars and work as expected.

SonarLint I reply heavily on SonarLint. It gives you static analysis findings in Eclipse. I also included the SonarLint Java Configuration Helper so it can see the version of Java I am using. (I”m on Java 8 right now so this is redundant at the moment. But I’m ready for when Java 9 comes out.)
Subclipse I trouble with Subversive in Eclipse Oxygen so I switched to Subclipse. I would have needed to switch this year regardless as Subversive is no longer supported.
Eclipse Memory Analyzer For finding memory leaks.
Freemarker IDE Freemarker syntax highlighting and macro assistance. Unlike with Eclipse Oxygen, this worked on the first install attempt.
Pydev Python plugin/perspective
Contrast To spot potential security issues. See my impressions of the Contrast plugin.
Bytecode Outline I’ve been looking at bytecode a good fit for the book to make sure I understand why things are happening. This plugin makes it easy. The version number has hex towards the end; maybe the number from github?
Pitclipse For mutation testing coverage


What excites me

  1. When searching using open resource/type, exact matches take precedence (vs files you looked at with similar name.) Also, it now shows the path in the workspace regardless of whether the filename is a duplicate. Both are nice usability improvements.
  2. The UI changed for the debugger. I like that you can see more variables in the debugger view without having to scroll or resize the window.
  3. There’s now a workspace option to “Sort library entries alphabetically in Package Explorer”. This makes it easier to find things than the default order (which is the classpath.)

What I didn’t like

  1. On Mac, the default font changed from Monaco to Menlo so keywords show in bold instead of just color. This was more of a “change is hard” thing. The first day, I didn’t like the new bolding. I wasn’t used to it so the keywords looked different. By the second day, I was used to it and it was just readable as the original. (I know I could have changed my workspace default back to Monaco if I continued to not like it).

Other interesting features

  1. Eclipse now supports Rust. I haven’t used it, but Rust is supposed to be an up and coming language.
  2. Eclipse supports Java 10 out of the box. Not that interesting because Java 10 came out in March. But good to know that Eclipse is staying current. I imagine there will be an Eclipse 4.8.1a in September or October for Java 11 support since Java 11 comes out in September. Eclipse did this for JUnit 5 so there is definitely precedent.
  3. JUnit 5 is included. This doesn’t excite me because I had been using 4.7.1a which also had JUnit 5 support. But if you are upgrading from the release a year ago, it is definitely exciting!

building motion profile generator with gradle and/or eclipse

Last year, I blogged about how to build Smart Dashboard with Gradle for FRC. Today, a student asked me how to build Motion Profile Generator using gradle. It’s similar, but seemed like a good time to update the post for this specific project.

You can use pure command line when reading/following this. Alternatively, you can use Eclipse as little or as much as you like. I include the Eclipse “gotchas.” (Spoiler: It’s faster to just use the command line)

Pulling from git

You can pull the code from git in any way you’d like. Common ways are:

  • From the command line (or git bash): git clone https://github.com/vannaka/Motion_Profile_Generator.git
  • From Eclipse, go to the git perspective, and paste in the URL.
  • Download the project from github as a zip file. (Please don’t choose this option. It is better to use git properly. The only reason I’ve ever done the zip option is if I need to look at a code on a computer where I can’t install anything.)

Running Gradle at the command line

The discussion was centered around building Motion Profile Generator. If you aren’t involved with a FIRST Robotics Competition team, this is used to help with autonomous programming. As with many Gradle projects, the project comes with Gradle right in the project. So all you have to is:

  1. cd to directory you cloned Motion Profile Generator in
  2. chmod 700 gradlew
  3. ./gradlew build

Make sure you have internet before running this the first time. If you want to build directly from Eclipse, see my Eclipse Gradle post and skip to the BuildShip section.

Where is the output when building SmartDashboard?

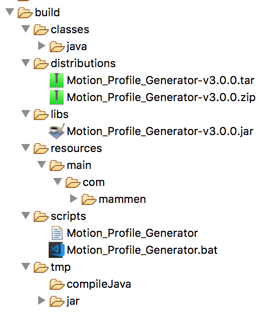
Running gradle creates a build directory. You can look at it on the file system. Or if you are using Eclipse,

  1. Configure the filters so show the Gradle build folder
  2. Add/remove the JRE library as described here to get rid of the Eclipse errors about access restrictions.
  3. Hit refresh before looking for it.

I don’t care how gradle works, I just want to run the program!

No  worries. Just:

  1. cd build/libs
  2. java -jar Motion_Profile_Generator-v3.0.0.jar

Ok now I’m curious, what gets generated?

This build directory  contains a number of things:

  • distributions – a zipped up and tarred up version of Motion Profile Generator which includes the jar file, all need dependencies and the script to kick it off.
  • classes – the compiled .class files
  • libs – a jar file with the compiled code in this project
  • resources – the JavaFX file (user interface files)
  • scripts – to launch Motion Profile Generator
  • tmp – would you really expect to find something important in a directory named tmp?

What does the Gradle build file do?
Gradle is a build tool. The build.gradle file in Motion Profile Generator contains Groovy code that declares what the build should do. Both Gradle and Maven follow “convention over configuration” which means that a lot is implied! I went over most (but not all) of this out loud in the classroom.

A plugin is like a helper tool that Gradle is going to use in order to build. For example, ‘java’ is going to compile among other things.  Most of these plugins are in common use. Gradle needs to download files in order to run. This includes some default plugins. These files are hosted in a repository for binary files. A really common one is Maven Central. This is used by both Maven and Gradle builds to obtain binaries. This build file is really simple. It says that Gradle needs to know how to build a standalone java application.

plugins {
    id 'application'
    id 'java'
}

This tells Java to put some information in the manifest. In particular, which class should run automatically when you try to run the jar. It also includes a version number for reference.

mainClassName = "com.mammen.main.Main"
version = "v3.0.0"

Remember the convention over configuration thing I mentioned earlier? Convention says the source code is in the nested directories src/main/java. This project decided to put the source code directly in the src directory. Therefore the project needs to inform Gradle of this non-standard location.

sourceSets {
    main.java {
        srcDirs = ['src']; include '**/*.java'
    }

    main.resources {
        srcDirs = ['src']; exclude '**/*.java'
    }
}

Normally, Gradle projects include references to dependencies on the internet. This project decided to supply them directly in a lib directory. Again, a non-standard thing to inform Gradle about. (I think this decision is because Pathfinder has extra files)

dependencies {
    compile fileTree(dir: 'lib', include: '*.jar')
}

Next the script specifies that we should create a jar file and an uber jar file including the special files..

jar {
    from configurations.compile.collect { it.isDirectory() ? it : zipTree(it) }
    // Set up manifest to point the main class to the right class.
    manifest {
        attributes 'Main-Class': mainClassName
        attributes 'Version': version
    }
	from ("lib/native_libs") {
		into ("")
	}
}

The end! The very last thing is to declare which version of Gradle this entire script should be run with.

task wrapper(type: Wrapper) {
    gradleVersion = '3.3'
}

Output from building in gradle

I’m including the output from a “good” run in case you have problems and want to compare. This is for the first time you run it. After that the download steps won’t be in the output and it will run much faster.

JeanneBrskysMBP:Motion_Profile_Generator nyjeanne$ ./gradlew build
Downloading https://services.gradle.org/distributions/gradle-4.7-bin.zip
.......................................................................

Welcome to Gradle 4.7!

Here are the highlights of this release:
 - Incremental annotation processing
 - JDK 10 support
 - Grouped non-interactive console logs
 - Failed tests are re-run first for quicker feedback

For more details see https://docs.gradle.org/4.7/release-notes.html

Starting a Gradle Daemon (subsequent builds will be faster)

> Task :compileJava
/Users/nyjeanne/git/Motion_Profile_Generator/src/com/mammen/main/ProfileGenerator.java:4: warning: OutputFormat is internal proprietary API and may be removed in a future release
import com.sun.org.apache.xml.internal.serialize.OutputFormat;
                                                ^
/Users/nyjeanne/git/Motion_Profile_Generator/src/com/mammen/main/ProfileGenerator.java:5: warning: XMLSerializer is internal proprietary API and may be removed in a future release
import com.sun.org.apache.xml.internal.serialize.XMLSerializer;
                                                ^
/Users/nyjeanne/git/Motion_Profile_Generator/src/com/mammen/main/ProfileGenerator.java:435: warning: OutputFormat is internal proprietary API and may be removed in a future release
            OutputFormat format = new OutputFormat(dom);
            ^
/Users/nyjeanne/git/Motion_Profile_Generator/src/com/mammen/main/ProfileGenerator.java:435: warning: OutputFormat is internal proprietary API and may be removed in a future release
            OutputFormat format = new OutputFormat(dom);
                                      ^
/Users/nyjeanne/git/Motion_Profile_Generator/src/com/mammen/main/ProfileGenerator.java:439: warning: XMLSerializer is internal proprietary API and may be removed in a future release
            XMLSerializer xmlSerializer = new XMLSerializer(
            ^
/Users/nyjeanne/git/Motion_Profile_Generator/src/com/mammen/main/ProfileGenerator.java:439: warning: XMLSerializer is internal proprietary API and may be removed in a future release
            XMLSerializer xmlSerializer = new XMLSerializer(
                                              ^
Note: /Users/nyjeanne/git/Motion_Profile_Generator/src/com/mammen/ui/javafx/MainUIController.java uses unchecked or unsafe operations.
Note: Recompile with -Xlint:unchecked for details.
6 warnings

BUILD SUCCESSFUL in 24s
6 actionable tasks: 6 executed